LACK Enclosure with Open Door Magnets and Other Improvements
- Arrives in 2 to 7 business days Printed in Auckland. $10 shipping, free over $75
- 14-day faulty refund If it arrives broken or misprinted, we reprint or refund it
- Secure checkout Card payments handled by Stripe
- Material
- High-Detail Resin (8K)
- Colour
- Grey
- Weight
- ~65 g
- Print time
- ~3.6 h
- Express shipping
- $20
More information
Leave a like or post a make if you print, I would love to see it!
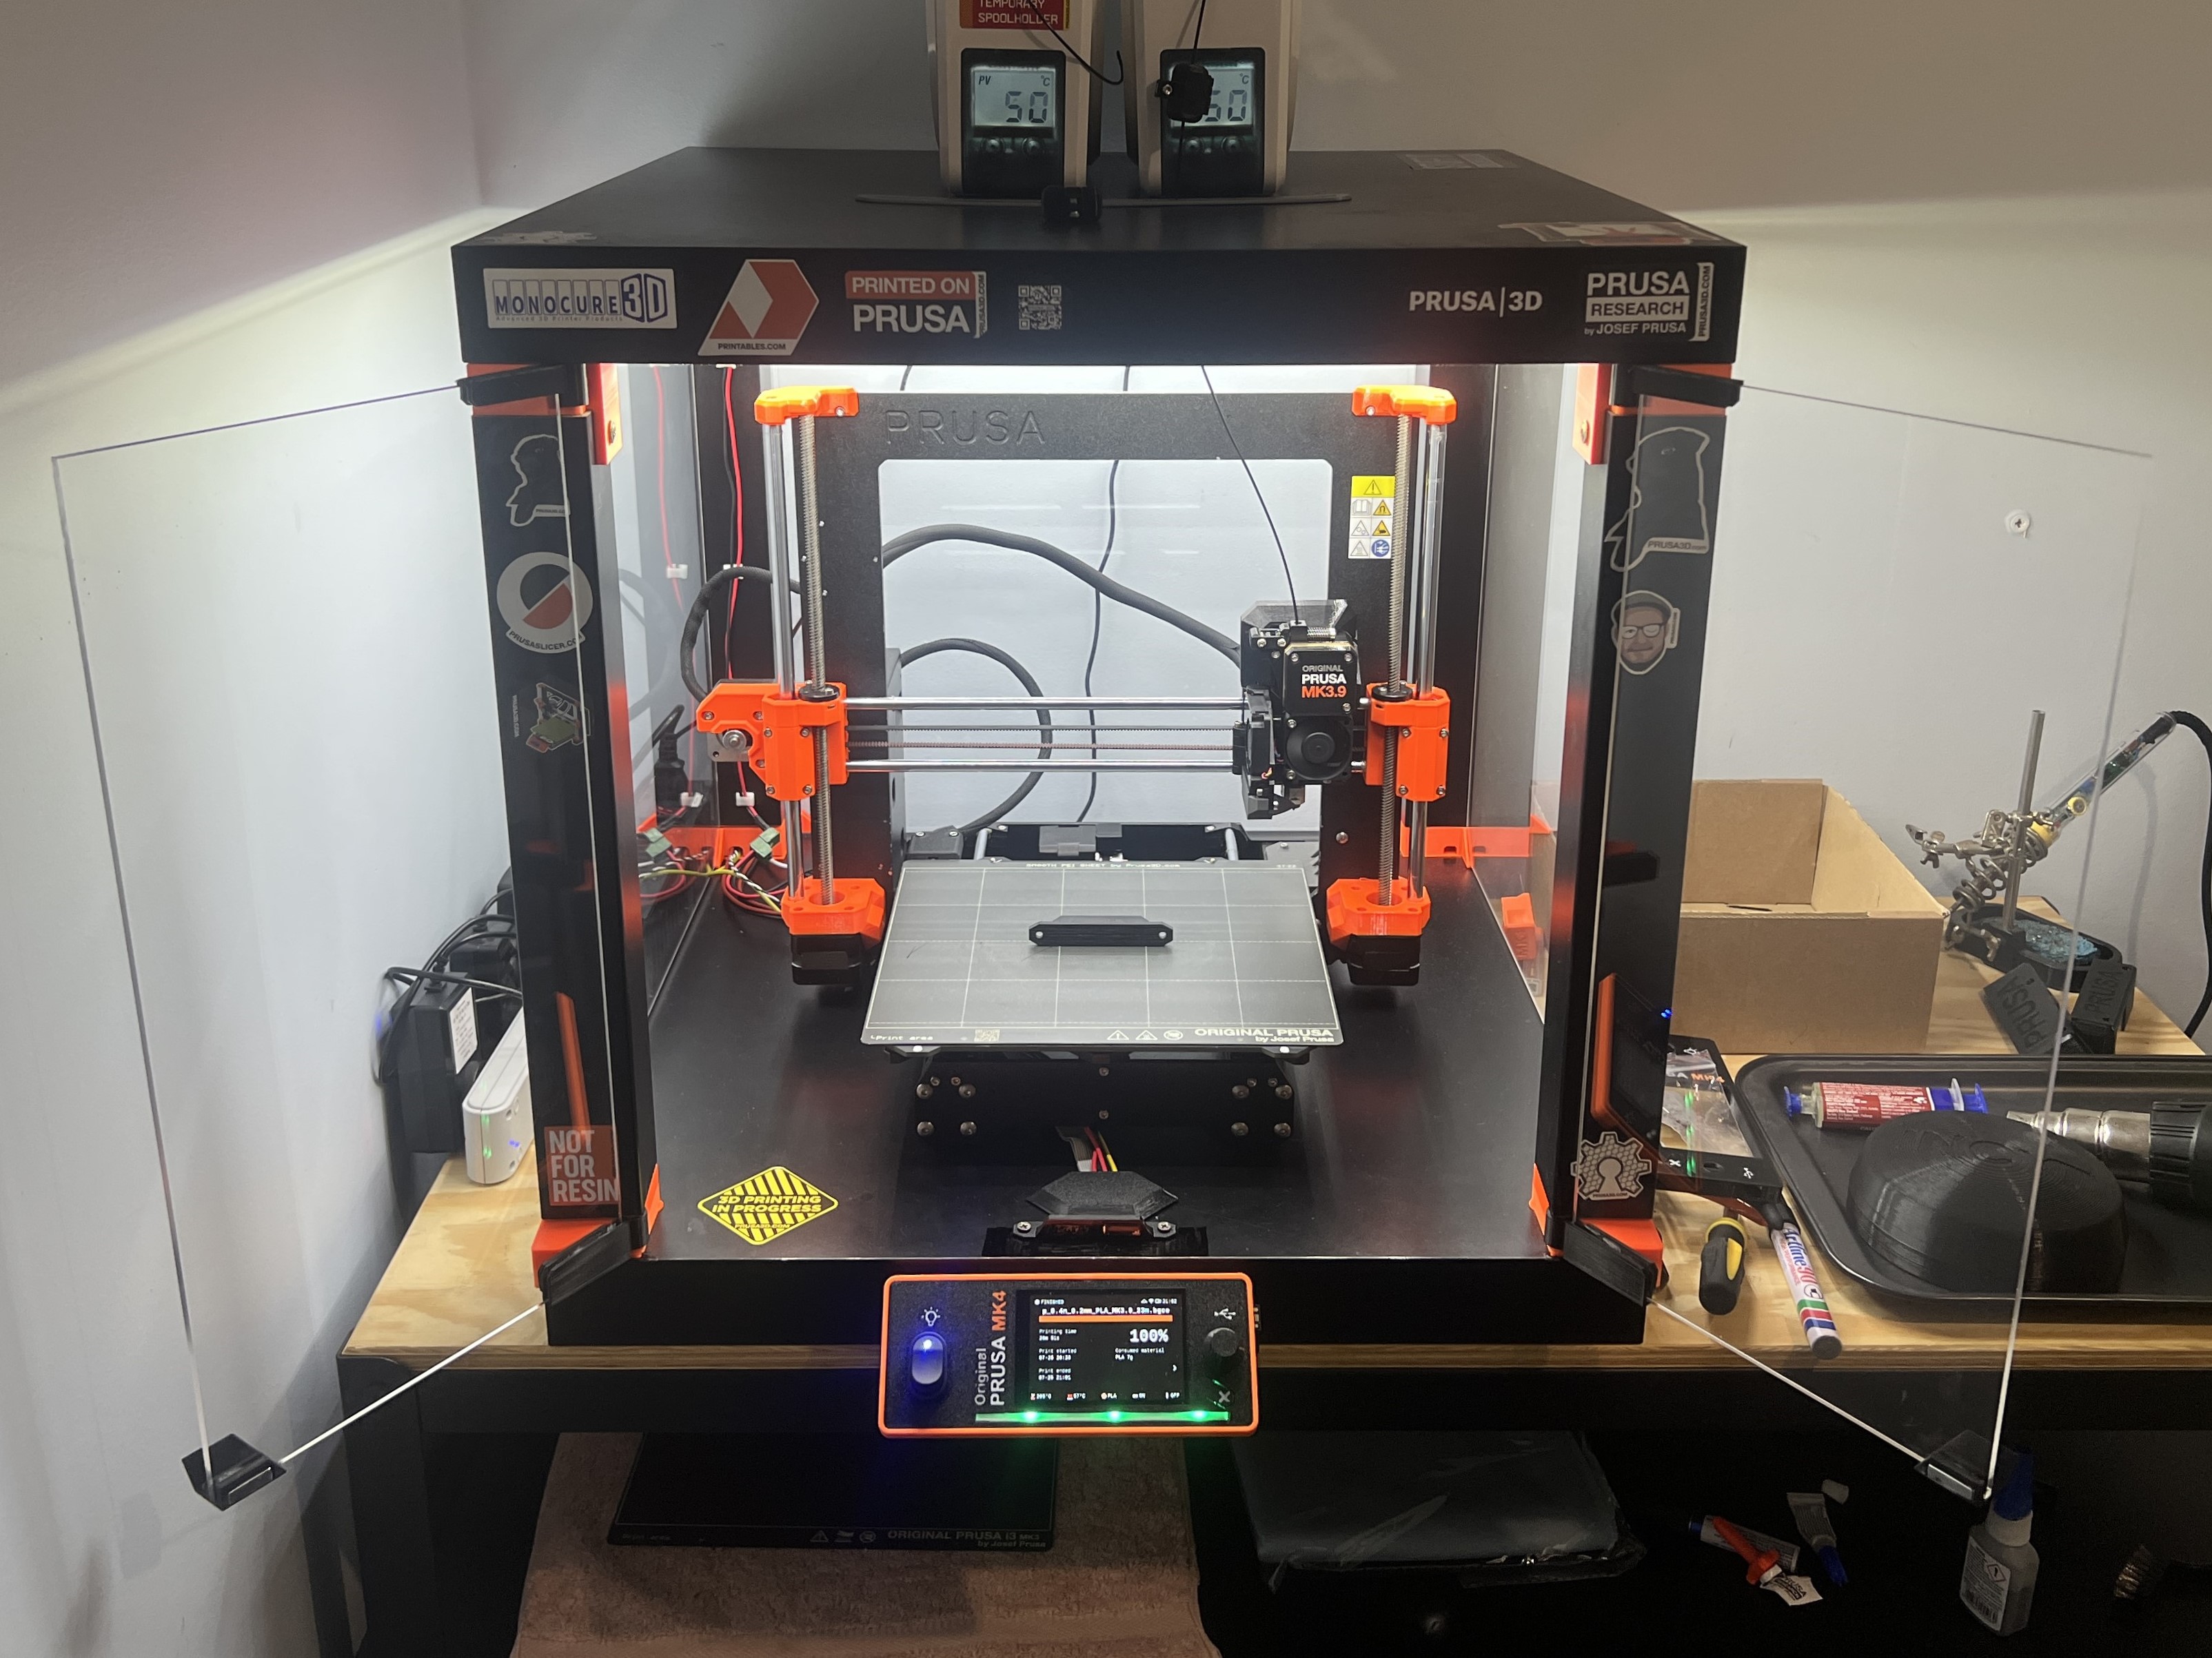
Stays faithful to original dimensions and layout of the LACK enclosure, but adds multiple ease of life and ease of assembly features. Only extra hardware required is a few extra screws and magnets.
If you are unfamiliar with the LACK enclosure - it is a popular cheap and effective printer enclosure made using an IKEA LACK table, some printed parts, and minimal hardware. See the original post for more information and how to assemble ( https://www.printables.com/model/17-original-prusa-i3-mk3-enclosure-ikea-lack-table-pr ).
File names: RTL Corner = Rear Top Left Corner, FBR Corner = Front Bottom Right Corner etc.
See all changes below:
Door open magnets
The doors on my LACK enclosure wouldn't sit open, one side would always slowly swing closed which was very annoying when trying to remove prints, load filament etc.
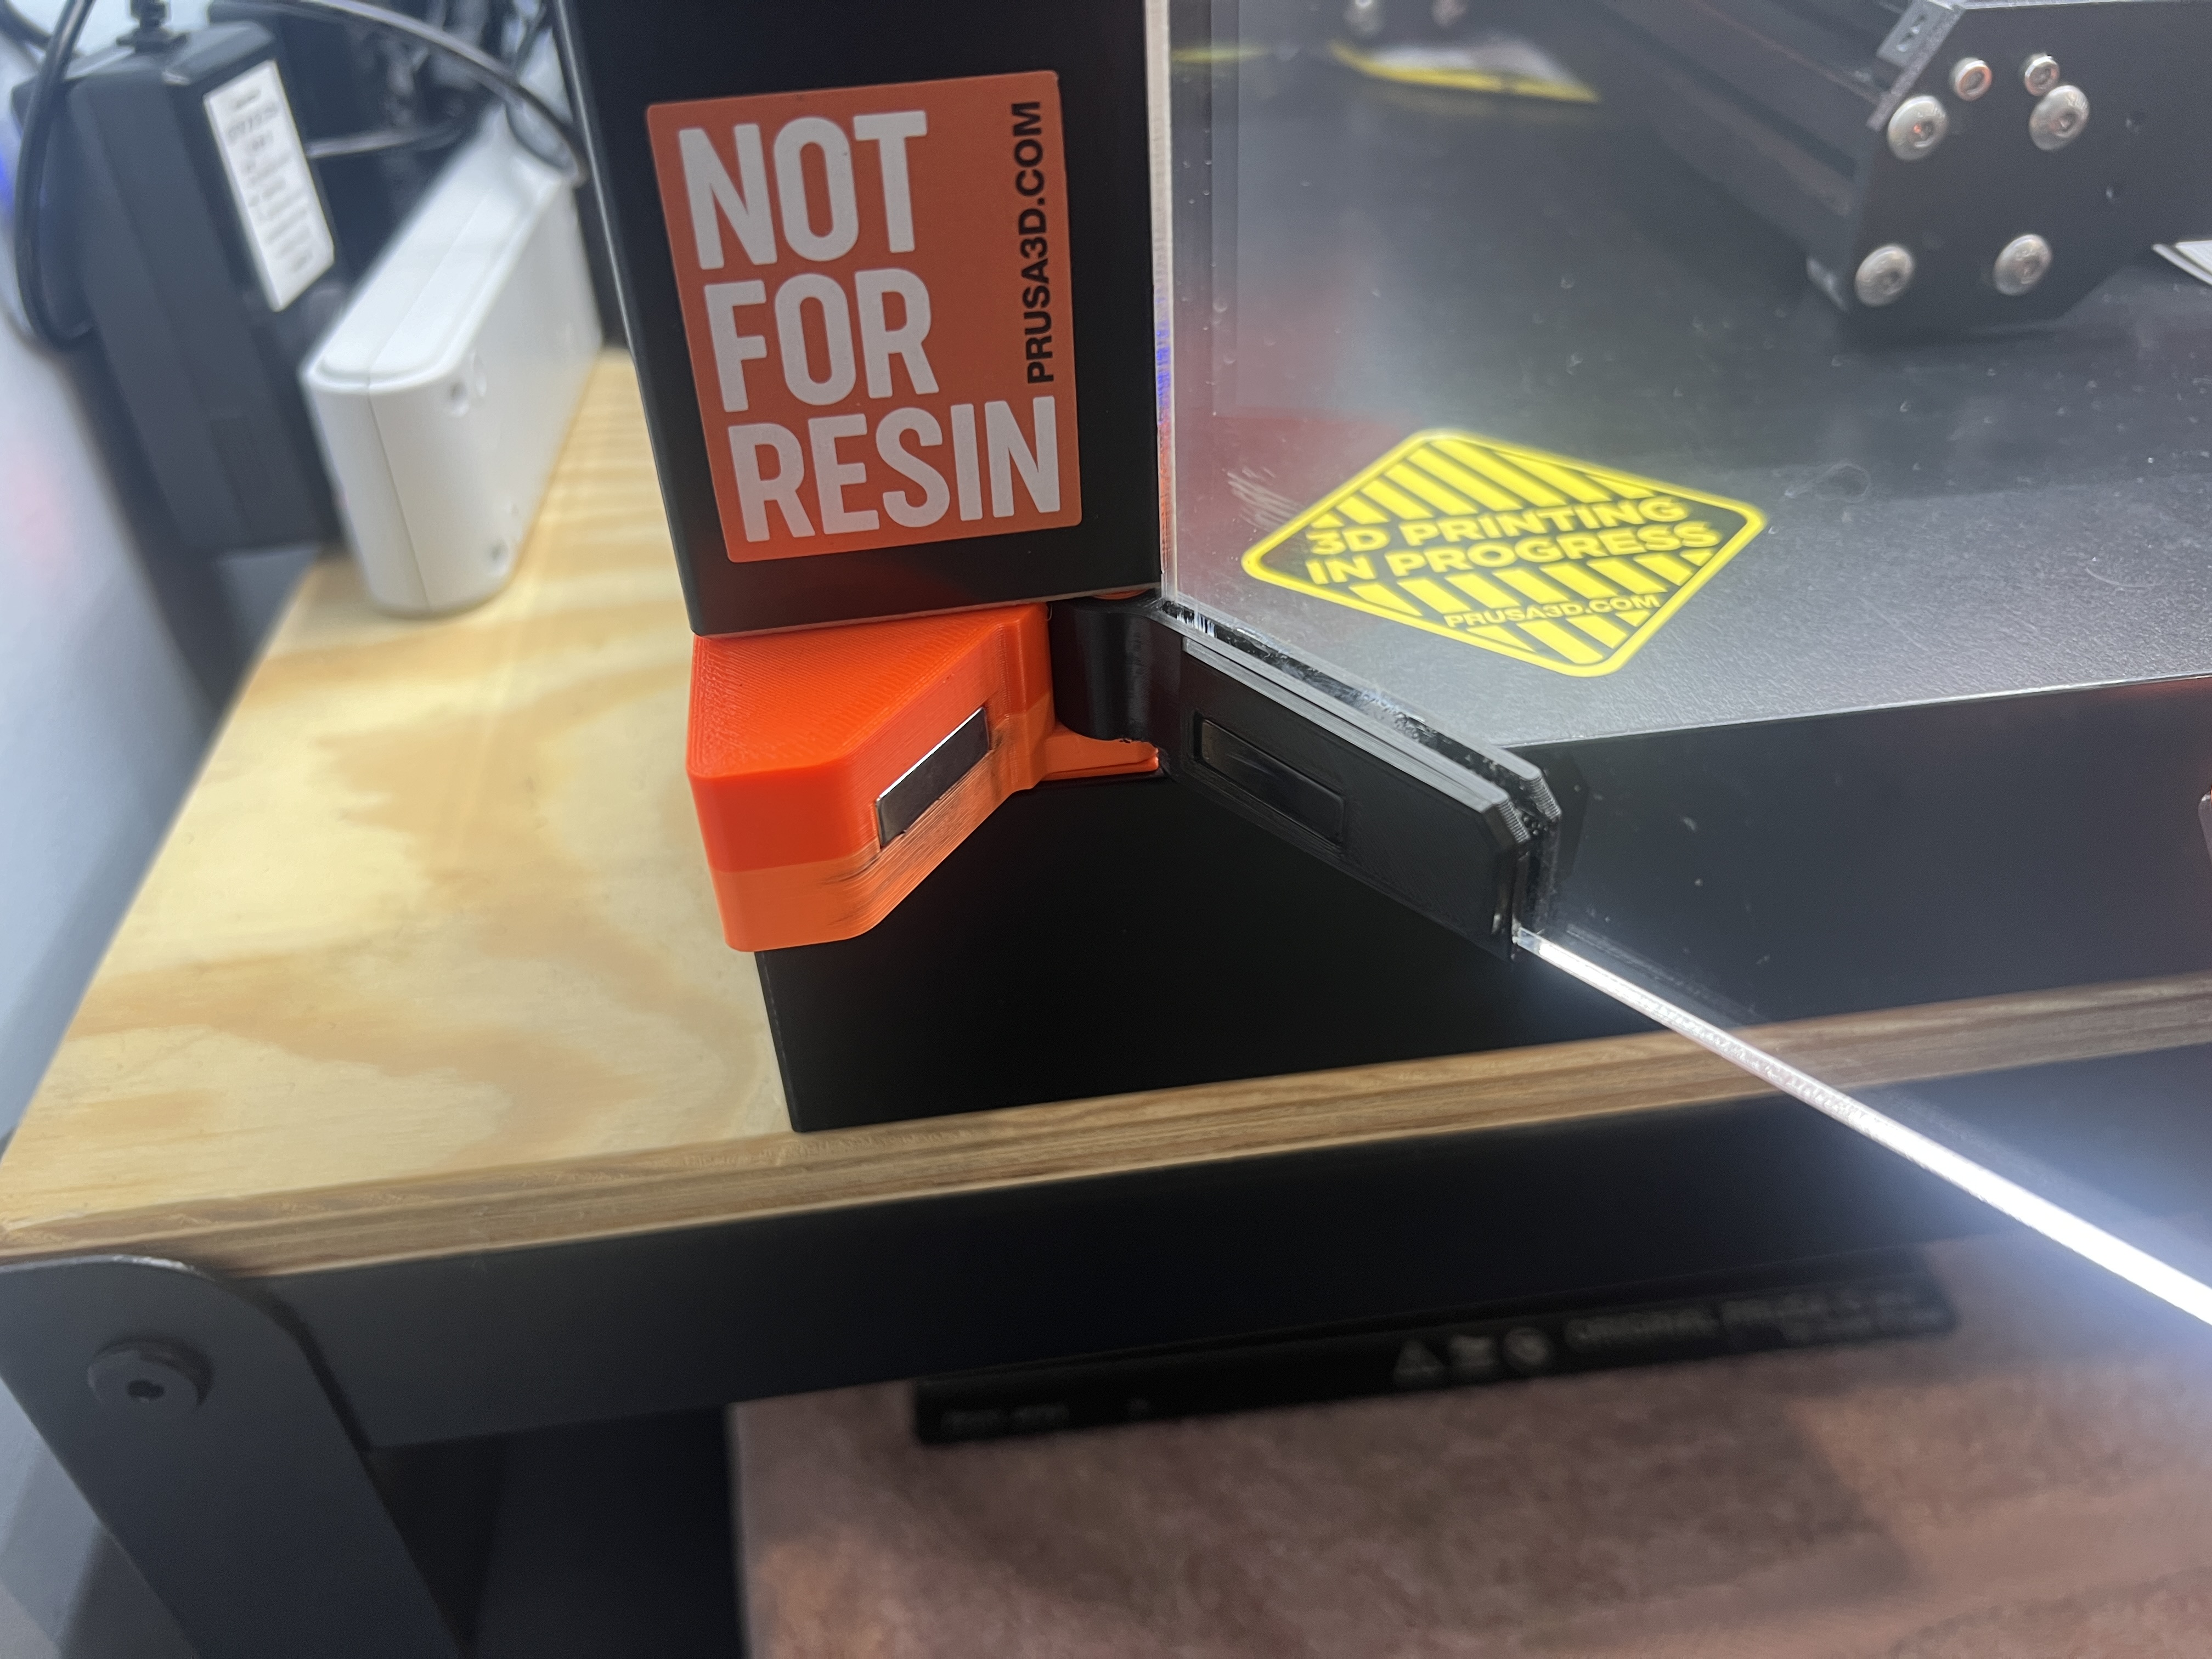
In this version the front bottom corners have protrusions to mount magnets, which will hold the doors firmly open once they're moved to that position. The bottom hinge parts have cutouts for the partner magnets.
Magnets are the same as the original - 20 x 6 x 2 Neodymium Magnets: https://www.aliexpress.com/item/1005004399996747.html?spm=a2g0o.order_list.order_list_main.5.3bd618022LjUgb
If you already have a LACK enclosure and only want the open door magnets, you only need to print the bottom hinges and the front bottom corners.
^If your hinges are glued to your acrylic - Select the bottom hinge STLs in this post and click split to objects in Prusaslicer ( https://help.prusa3d.com/article/split-to-objects-parts_1751 ). The parts will split into two - the original hinge part, and the extra protrusion to hold the magnet. Delete the original hinge part and print the extra part. Glue it to your existing hinges and then glue the magnets into them. Consider the material of your existing hinges. If these parts are PETG make sure to use a glue that will work with polyethylene (superglue will not work very well at all).
To glue PLA to PLA - Use superglue or 2 part epoxy.
To glue PETG to PETG - I use this product - https://www.loctite-consumer.com.au/en/products/superglue-all-plastics.html there are many glues that will work, just read the details and ensure the glue is suited for polyethylene.
To glue nickel plated neodymium magnets to PLA - Use superglue or 2 part epoxy (I recommend epoxy as the magnets have a lot of pull force).
To glue nickel plated neodymium magnets to PETG - Use Loctite 480 instant adhesive. Slightly more pricy but worth it. Keep in mind that though it says instant, I would recommend letting it set for at least an hour before putting any other magnet near it or that magnet will pull it out again.
Extra screw holes
All corner parts have at least 3 screw holes to stop the legs of the LACK table turning around a single central screw, as they are able to in the original design.
Extra cable slots
Each rear bottom corner (left and right) has two cable slots to run all the wires you need. PSU cables, LED strip power, sensors, camera, etc. Make sure to use with the corner cones with matching double cutouts, included in the files.
Door stop magnets are enclosed
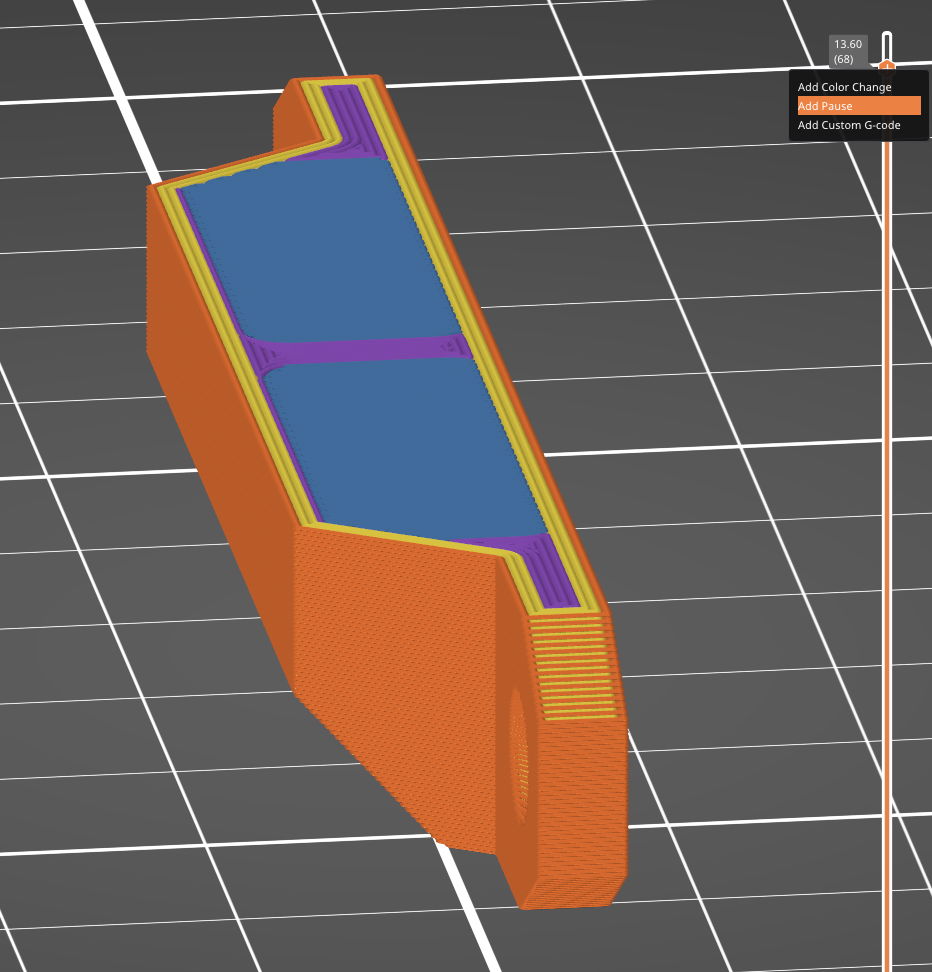
The door stop file has fully enclosed magnets. When slicing, turn supports off and put a pause on the first layer that bridges across the magnet holes. See the last image. Also see this guide (https://help.prusa3d.com/article/insert-pause-or-custom-g-code-at-layer_120490 ). When the print pauses here, put a drop of superglue in the holes and push the magnets in (check their orientations so they will match the door handle magnets). Give the glue a minute to set before resuming the print, which will print a couple more layers over the top of the magnets, sealing them in. This has multiple benefits:
• The door stop has a very clean and flush appearance • The magnets can never pull out • Extra 0.6mm distance between these magnets and the partnered magnets in the door handles means the doors are a little bit easier to open, as in my opinion the force of the magnets holding the doors closed was a little unnecessarily excessive in the original design.
Sleeker door handles
Smaller door handle parts look sleeker and don't get in the way of an externally mounted xLCD. Still easy to grab.
Better magnet tolerances
Magnet tolerances are way tighter so they are held in much better. Printed on my MK3.9 they are a tight fit but still easy to press in. You will still need to use glue under the magnets though.
Other accessories and modifications in images (all great for a superb LACK enclosure setup)
• Flat xLCD case with light switch and defuser - my remix of a design by vojtz. (@Nexl): https://www.printables.com/model/954514-lcd-cover-for-prusa-xl-mk4-mk39-mk35-flush-light-s • LACK exterior xLCD mount (supports) by Zenmaster33 (@Zenmaster33_221864): https://www.printables.com/model/709669-lack-enclosure-external-xlcd-mount-mk4-supports • LACK exterior xLCD mount (screwed in base part) to be used with the cable entry slot (see below) designed by me: https://www.printables.com/model/954594-xlcd-external-mount-base • Cable entry slot that goes through LACK for exterior xLCD mounting by JayS (@JayS): https://www.printables.com/model/654536-prusa-mk4-cable-entry-ikea-lack-enclosure • Angled heat bed cable strain relief: https://www.printables.com/model/564413-mk4-heat-bed-cable-strain-relief-short-60deg-split • Slot in top of LACK for filament entry by poulanker (@poulanker): https://www.printables.com/model/34334-ikea-lack-enclosure-filament-slot
Design and description by BMPrintShop , licensed CC-BY-SA.
Frequently asked
How long does shipping take?
LACK Enclosure with Open Door Magnets and Other Improvements is printed to order. Lead time is typically 1-3 business days plus 1-4 days NZ shipping. Standard NZ shipping is $10, free over $75.
What material is this printed in?
By default this is printed in High-Detail Resin (8K) at 0.025 mm layer height on an MSLA resin printer. Custom material and colour swaps are available, just leave a note at checkout.
Can I get this in a different colour?
Yes. Every product can be printed in any of the resin colours we stock, or hand-painted on request. Leave a note at checkout or email [email protected].
Do you ship outside of New Zealand?
Currently New Zealand only. Australian shipping is coming.
Who designed this?
Designed by an independent sculptor and licensed for commercial printing. The original is linked on this page.